Do you want to shave your ammo costs in half and shoot 1/2 inch inch groups at 100 yards?
Reloading your own ammo might just be the answer you’re looking for!
But not quite sure it’s something you’d be into? In this article I’ll cover everything from the reasons to reload, to how difficult it is to get started…
Plus- do you really end up saving that much money? I’ll dive in to all of this as well as different equipment setups that fit various budget types.
Before we start, my lawyers said I should post a disclaimer that the following information in this article is purely for entertainment and educational purposes. If you choose to get into this hobby, you’ll be working with things that go bang and you should probably be careful. 😉
Now that we got that out of the way let’s continue:
Table of Contents
Top Reasons To Reload Your Own Ammo
1. Saving Money
I think this is one of the most common reasons a lot of people get into this hobby…but it can be a tad deceiving. I don’t think any reloader really ends up saving money overall but one can shoot a lot more for the same cost.
But can you still save money per pound?
Yes!
In fact a large portion of the cost of ammo actually comes from the brass itself. So why let your shooting range or personally throw away the spent brass when you can reuse it a couple of times?
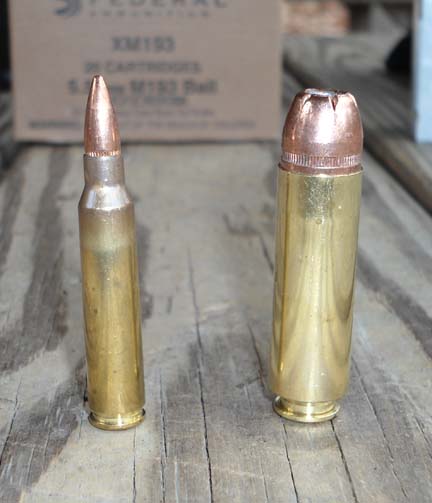
When it comes to more expensive ammo, this is where the real cost savings start to come in. Let’s take a look at an example where I’ve saved more than 50% on costs:
Match grade .308 ammo runs for about $2.00 per pound new. Where as when I reload it myself it ends up costing me only $0.70 a pound!
2. Maximizing Accuracy & Customizing Your Rounds
This tends to come up second and for a good reason!
Reloading allows you to create custom round for each and every gun that you own.
To expand, we need a brief lesson in barrel harmonics:
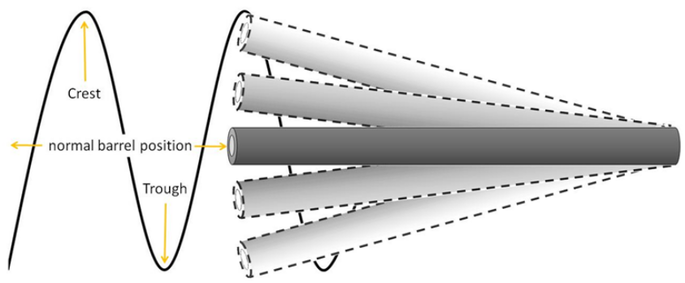
When you shoot a round the barrel of the gun whips around. A good way to increase the accuracy would be to reduce this action in any way possible. One way to accomplish this to adjust the speed at which the bullet travels through the barrel. This can be done by either adding or reducing the amount of powder added to a round during the reloading process.
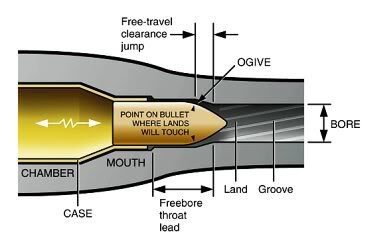
Another way would be to extend the length of a round (done by seating the bullet further out of the brass casing). This reduces the force needed in order for the bullet to leave the brass when fired and also the distance in which the bullet will need to travel to enter the “lands” (or rifling) of the barrel.
The other big reason I mentioned is being able to customize the round itself by using different bullets, especially when it comes to competition shooting or hunting..
One example is that when I shoot my USPSA handgun I like using heavy 147 grain bullets because they feel more like a “push” to me when shooting. Also my .308 bolt action performs better with 175 grain hollow point boat tail bullets which is a problem for me as most match grade ammo comes in 168 grain.
If you’re lost…no worries! You don’t have to optimize every round for every gun you own. I just think it’s cool that you can if you want to! The majority of what I reload is for plinking any way and closely matches regular ammo.
3. Restrictive Firearm Laws
This mostly falls under the idea of saving more money.
Unfortunately gun laws are becoming more restrictive as the days pass. There’s already a big list of cities that prohibit the sales of ammo on the internet, not to mention California- who recently passed a bill that requires background checks as well as a licensed vendor by the Department of Justice to purchase ammo.
By learning to reload you can prepare and protect yourself against price gouging, shortages, and hoarding of ammo that tends to set off during unfortunate news events, the passing of restrictive laws, or elections.
Just be sure you stock up on supplies of course if you decide that reloading is for you!
4. For Fun
Let’s be honest, if you enjoy customizing your gun to perfectly compliment your style then you’d probably also love the process of squeezing every bit of accuracy you can out of your firearm.
Also if you describe yourself as a ‘Do-It-Yourselfer’ then there’s really nothing more DIY like making your own ammo!
Plus there’s even mechanical things to play with and upgrade when it comes to the ammo presses (the ammo making machine).
How To Reload Ammo
Now that we’ve covered some reasons that makes reloading awesome, let’s go over some of the steps involved in the process.
Keep in mind that this isn’t specific to any one caliber and is meant to be more of a rough overview. Some calibers require that you follow all the steps and others just need the bare minimum.
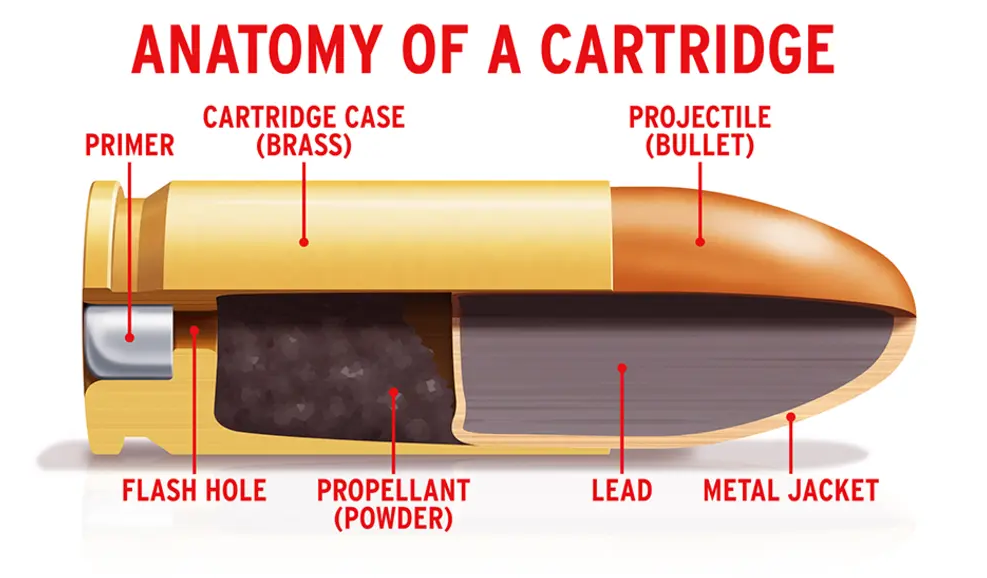
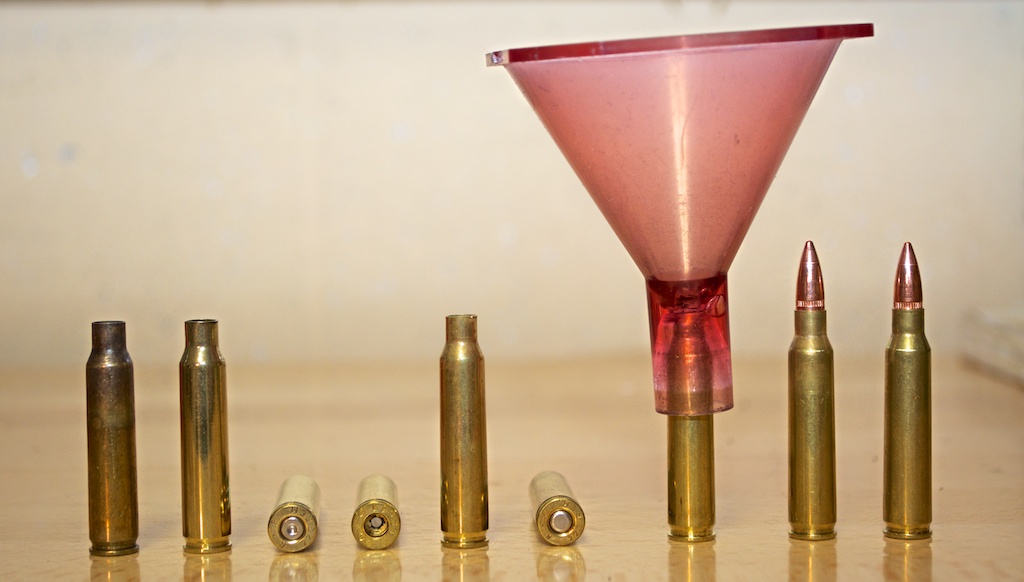
The Parts of An Ammo Round
First a little crash course refresher:
Simply put, here are the parts to the bullet cartridge:
- Primer
- Brass Casing
- Gun Powder
- Bullet
The hammer inside the gun strikes the primer which creates an explosion that ignites the gun powder and pushes the bullet out of the barrel.
You will be preparing the brass and then putting all of these parts together throughout the reloading process.
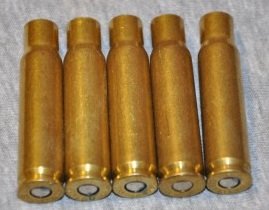
Prepping The Brass
When you make your gun go PEW, the explosion that occurs inside the brass casing makes it expand to the chamber of the gun. There’s some amount of a shrinkage (heh) that happens after but for the most part the brass has expanded to a size larger than before.
It’s also becomes lot dirtier!
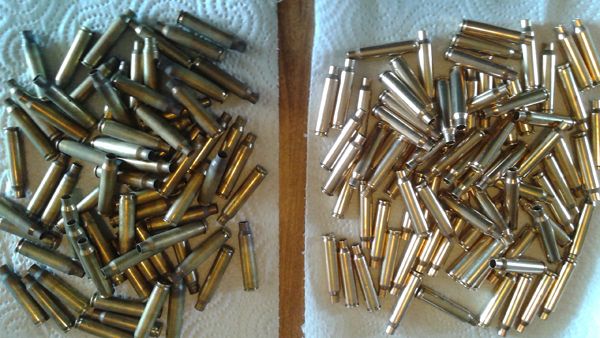
Before anything else, you’ll want to prepare the brass by cleaning and polishing it via a brass ‘tumbler’. You can either do this ‘wet’ or ‘dry’ and there are prons/cons to both.
Wet tumbling scrubs the brass with steel pins and a liquid solution, and dry tumbling agitates the brass within a medium such as ground up walnut shells or corncob.
You likely want to do this outdoors or in a garage as it tends to be loud and has some potential of lead contamination.
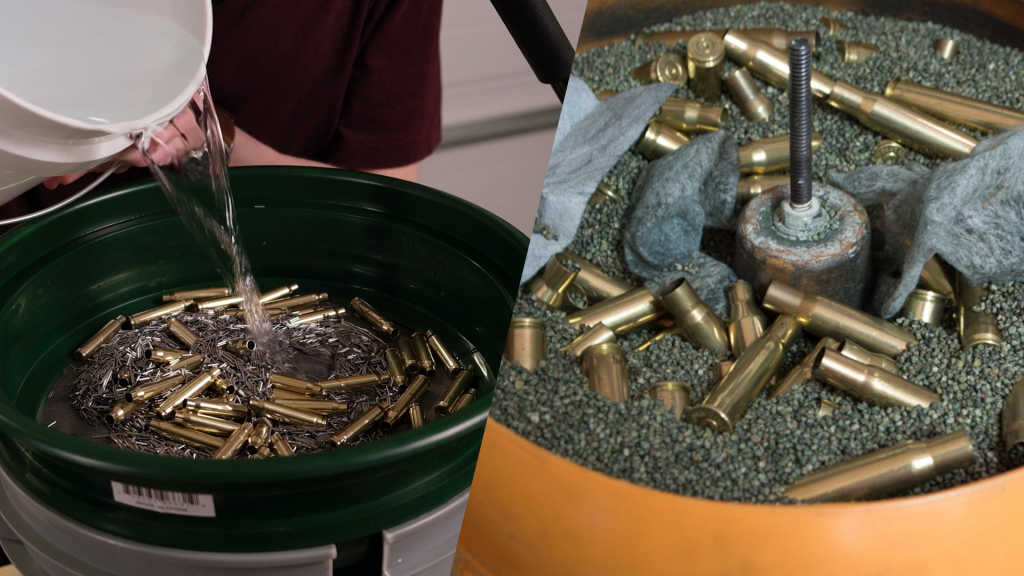
Whoohoo! That’s some fine looking brass…
Next, if you’re going to be reloading spent brass- you’re going to have to restore it to original factory specification so that it will reliably feed inside your gun.
Remember the primer?
At times you will using military brass which the primer pocket has been crimped (where the primer sits). Or you may want the pocket to be super uniform to maximize precision.
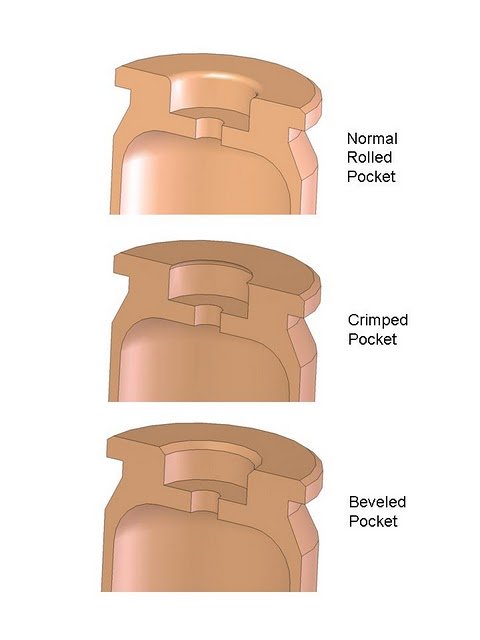
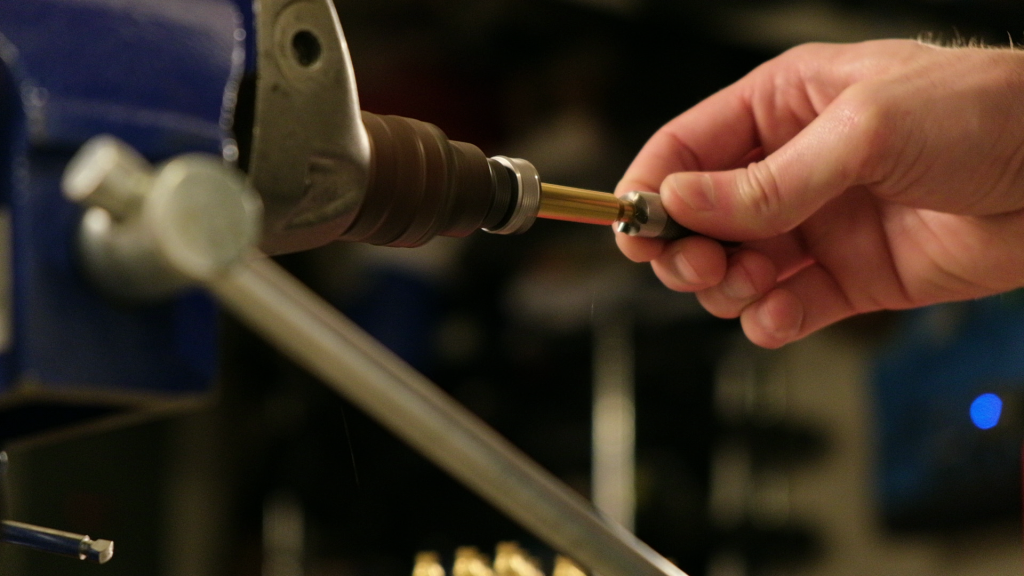
You will have to pop the old primer out (deprime) and then use a ‘reamer’ tool to resize the pocket in preparation for a new one. Some people prefer to do this before they tumble the brass so that you don’t have to clean the the pocket as well (I know I do).
There are various ways to the pop the primer out but it’s usually done with a reloading press and typically while also resizing the brass.
Speaking of resizing the brass…
There are two main types of brass casings: Straight Walled & Bottleneck. Pretty straight forward.
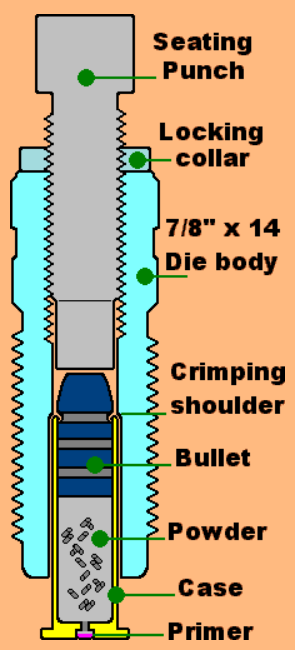
You will run each brass casing through a resizing die which will reform the brass back to its original size. It’s generally good practice with most dies and calibers to lube each case so it doesn’t get stuck inside the die.
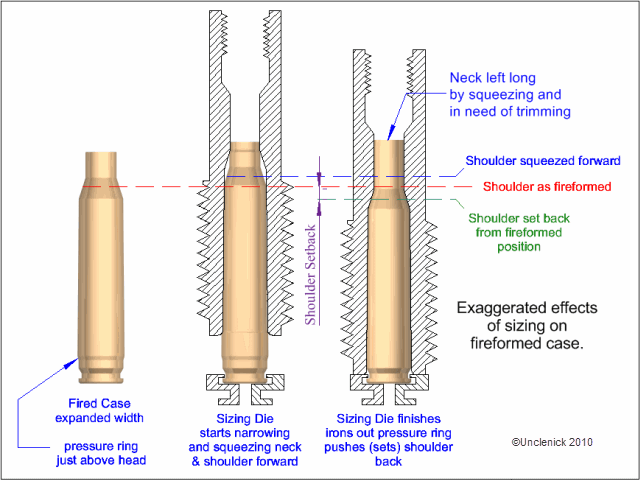
You can see by the above illustration that a lot happens within the die during resizing because of the ‘shoulder’. Popular examples include the .308 or .223 calibers. A lot less happens with straight walled caliber brass used in most pistols.
The resizing die also out reforms any minor dents or case mouth issues.
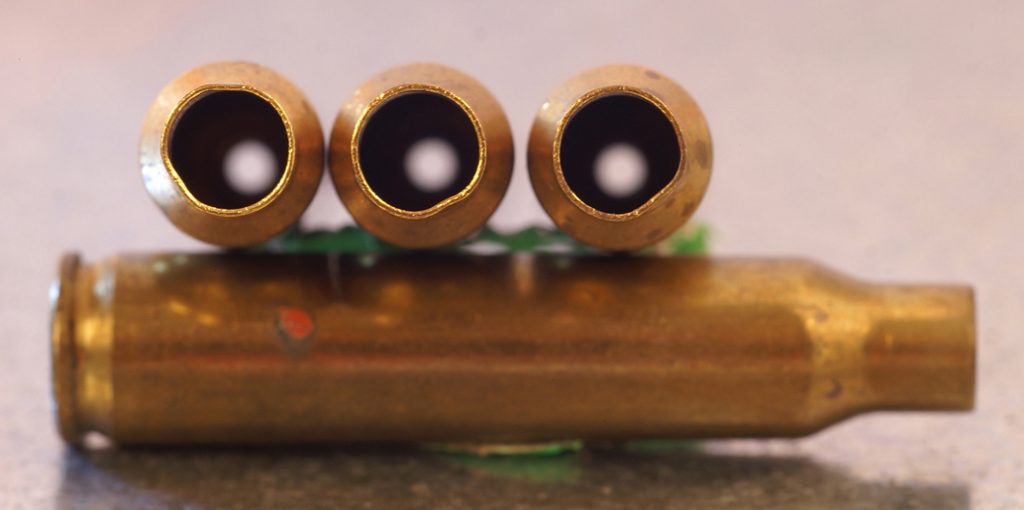
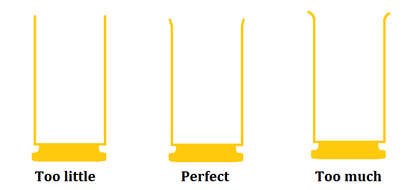
Depending on the type of caliber, how particular you are, or how many times the brass has been shot with, you might need to check the brass for proper length. Since the brass has been squeezed down, there may be excess length that you will need to trim.
There are various hand based tools or even electrical option available for this.
If you do end up trimming off any excess brass, it’s going to be fairly sharp which might mess up your ability to seat a bullet. In this case you will need to ‘deburr and chamfer’ the mouth.
Again there are options…
Are you still with me? We’re just getting started… At least the brass is properly prepared and inspected for any cracks, large dents or splits right? Sweet, let’s move forward!
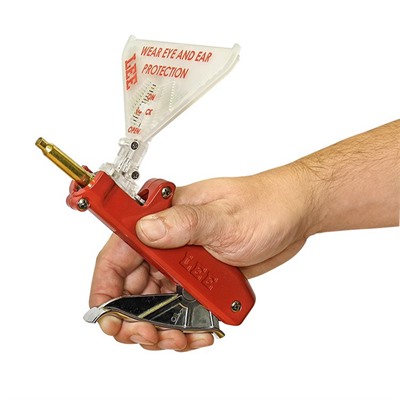
Priming
There are various tools available for priming a bullet. Some include hand tools while others are integrated into the first stages of of sizing on your press.
Now that you’ve got your cases primed, let’s get some powder loaded shall we?
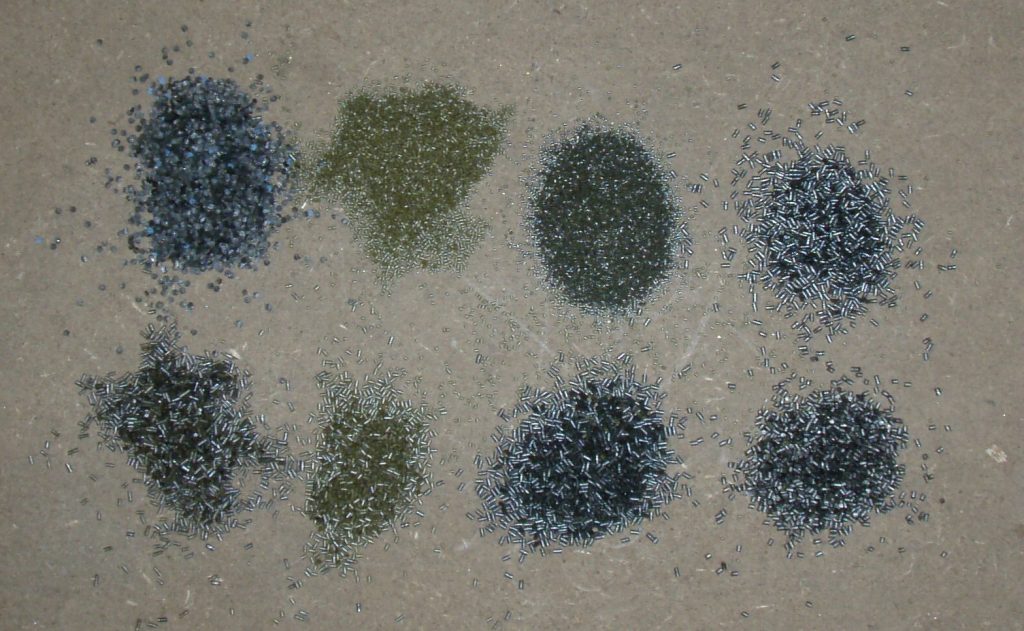
Throwing Gun Powder
Technically speaking, it’s ‘smokeless’ powder and there’s a whole lot of different types to choose from. Many of them will work for your chosen bullet/caliber but some are more specific to certain calibers or bullet weights.
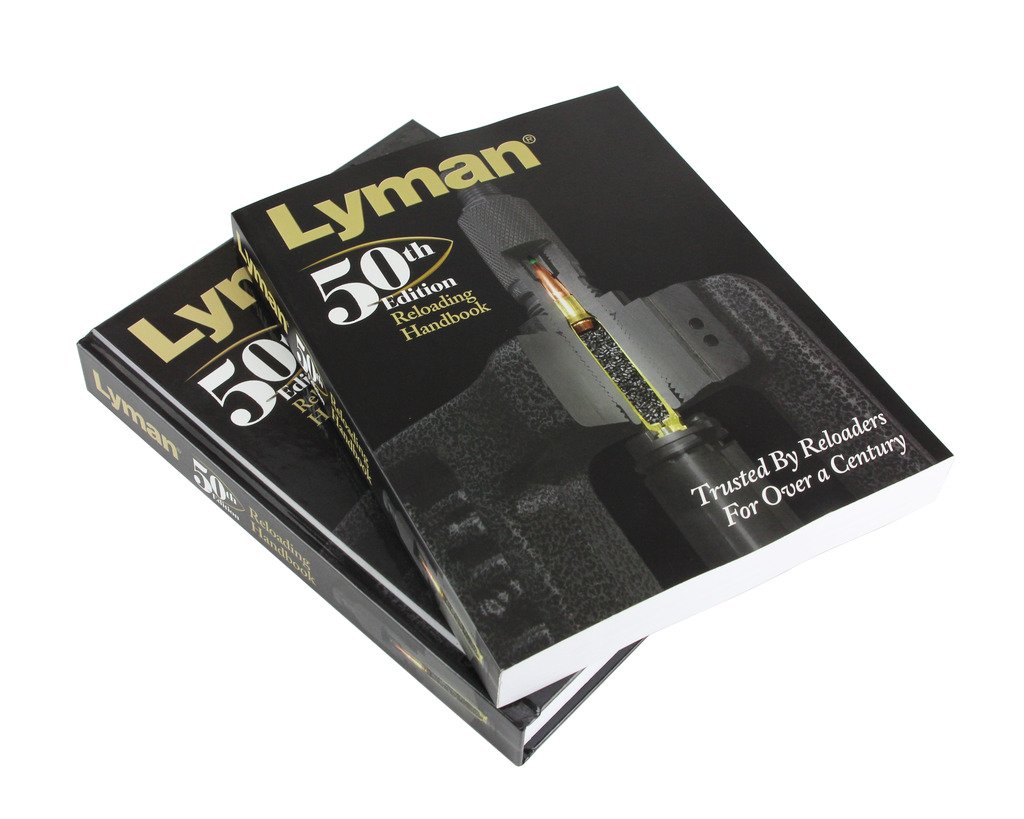
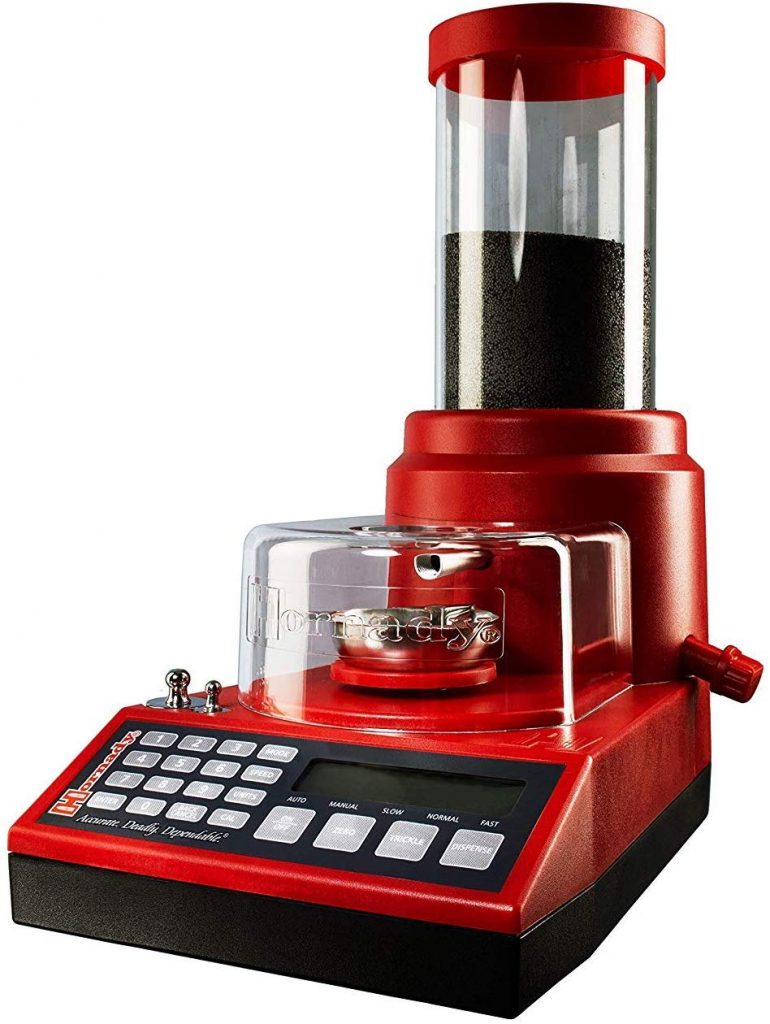
The amount you load will be dependent on the caliber that you load and will have some tolerances to work within depending on your desired outcome. You can look this information up in a reloading manual. The manual is also a great place to reference the correct size and dimensions needed for case length as well.
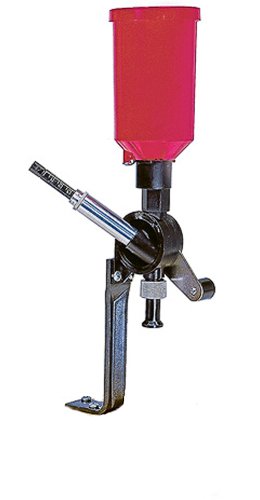
Yet again, there are many ways to measure and drop powder into a properly prepared and primed case. The most popular being stand alone powder measures or as a part of a multistage press.
Seating The Bullet
We’re now approaching the home stretch! Whew, it seems like a lot but it’s not bad once you get in the swing of things.
Now it’s time to get the bullet get the bullet pressed into the case.
Something to note before get started with this step is that some cases will be too narrow after resizing (usually pistol cases) and you will need to “flare” the top of the case.
After that, you just have to loosely fit your bullet of choice into the top of the casing and then run it through a bullet seating die using your press. You can also configure the die in such a way to that it adds a small crimp (pushing the case into the bullet) during the process that adds a little more security to the bullet. This tends to be a matter of preference for some.
AND…Done! Just like that you have yourself a full loaded and ready to shoot round. Now let’s take a look at the equipment that makes all of this possible…
Types of Reloading Press Setups
There are various types of Reloading Presses ranging anything from a cheap single stage one that can handle only one die/stage at a time, to monstrosities that can churn out 1000+ rounds an hour.
Single Stage Press
Just as this name implies, a single stage press can only handle one die and thus one stage of the reloading process at a time. You will need to swap out different types of dies a couple of times (if not more) depending on the task at hand.
At the very least there is a resizing die and a bullet seating die. Depending on what dies you get you can either have the depriming / priming steps combined in one of those dies or done separately through an additional step.
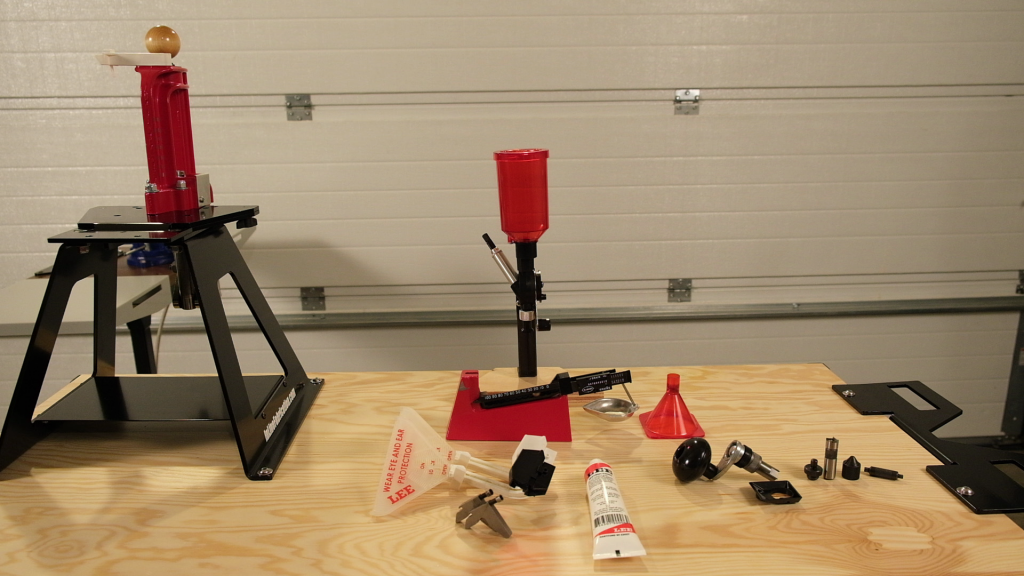
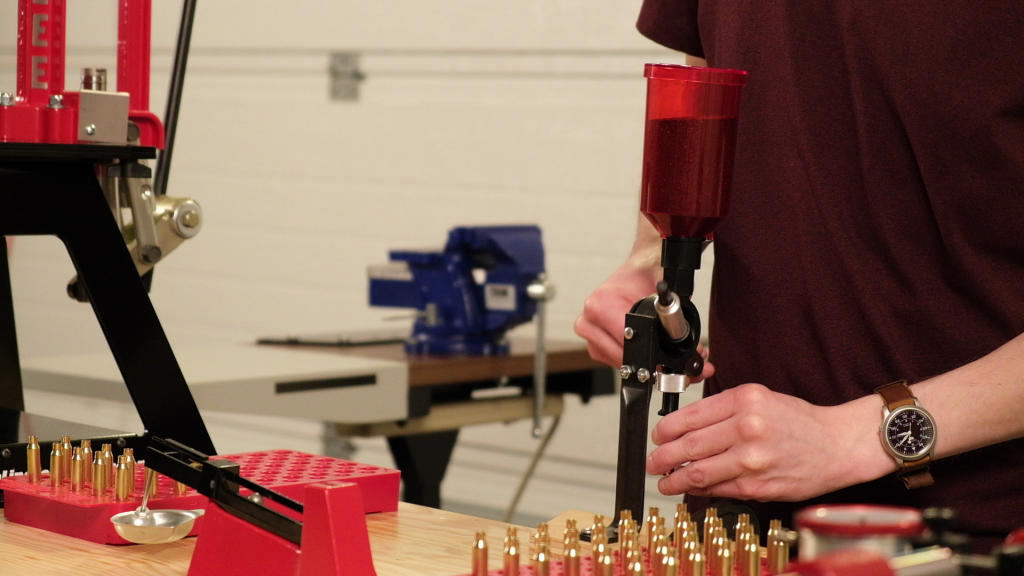
The one pictured above is the the Lee Precision Breech Lock Challenger Kit ($143 at the time of writing this). It comes with just about everything you need to get your feet wet in reloading. There’s some good additions in the ‘Frequently Bought Together’ section on Amazon.
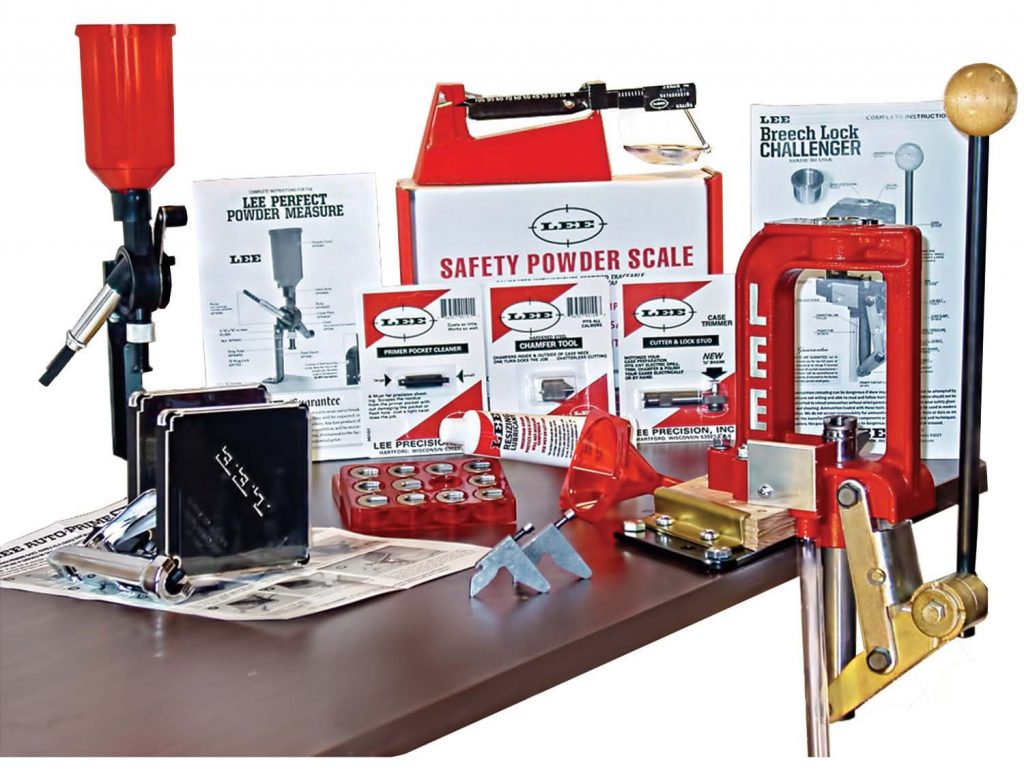
Included in this kit is the press, some case prep tools, primer assembly, and a powder measure/thrower. You just need to purchase your caliber specific die kit and you’re off to the races!
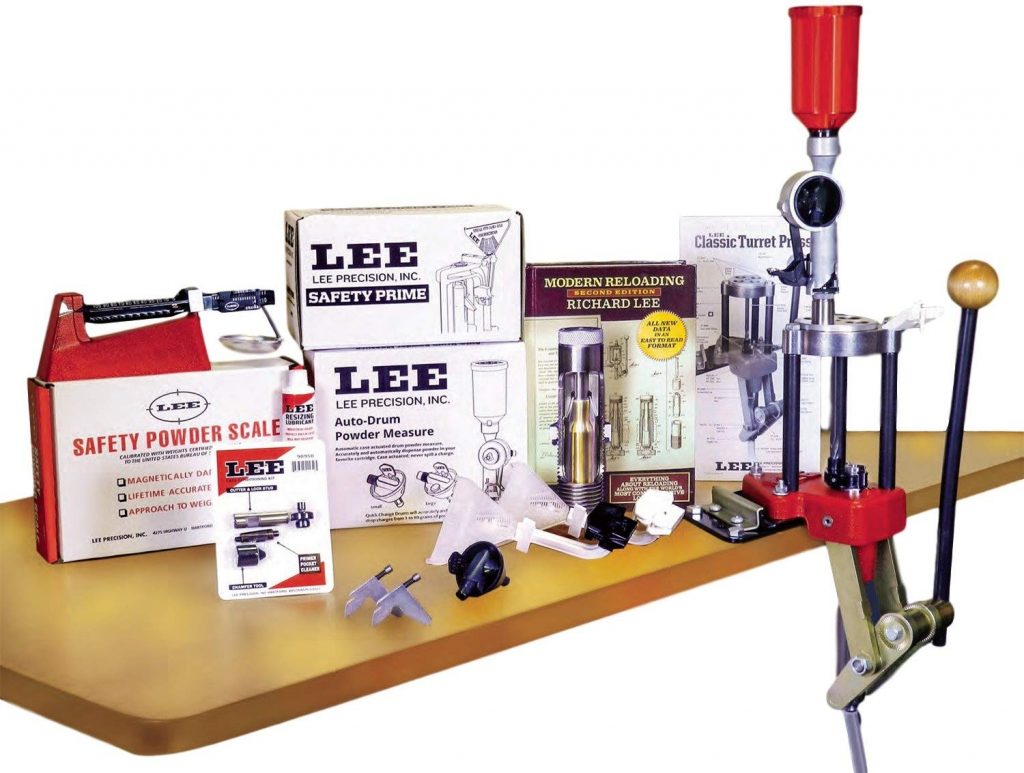
Turret Style Press
A turret press adds the super time saving ability to have multiple dies rotated over the case you’re reloading. This essentially eliminates the need to swap dies for each step of the reloading process.
Pictured below is the Lee Classic Turret Press Kit ($222 at the time of writing this). As you can see the powder thrower is attached to the press including additional slots available for your desired dies.
Progressive Style Press
The advantage of a progressive press is simply the ability to do multiple steps at once within a single pull. It not only rotates multiple dies above the casing but also holds multiple casings as well.
Some fancier models also have something called “toolheads” that allow you to do change out calibers quickly without resetting the dies.
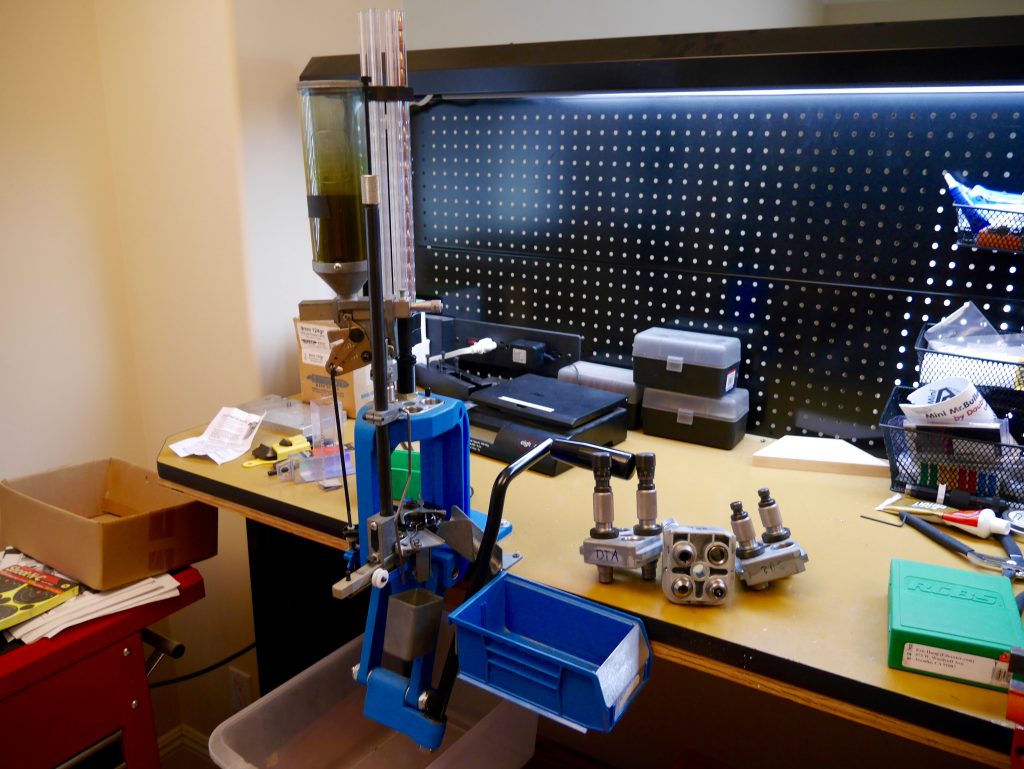
I love and use the Dillon 550(B) Progressive Press but there is an upgraded C model available now that I would recommend buying if you want to go straight to the gold and really crank out the rounds. It has some minor upgrades over my older model that makes it worth the extra pennies…($569) 😉
Conclusion
Ok I can’t really call this the conclusion because there are so many other things to go over like the tumbler, caliber specific dies, powder types, primers, etc.
Plus how do you actually reload your desired calibers?
Luckily for you, we have solved all your problems! Okay okay…not all of them, but we have made learning the process a heck of a lot easier.
Over at our main page DIYReloading.com we talk about all the resources we have available to get started in your reloading journey, including a step-by-step video reloading guide that leaves nothing out! Click on the button below to check it out: